Purchase Order
A Purchase Order is a binding contract with your Supplier that you promise to buy a set of items under given conditions.
It is similar to a Sales Order but instead of sending it to an external party, you keep it for internal records.
Home > Buying > Purchasing > Purchase Order
1. Prerequisites
Before creating and using a Purchase Order, it is advised that you create the following first:
2. How to create a Purchase Order
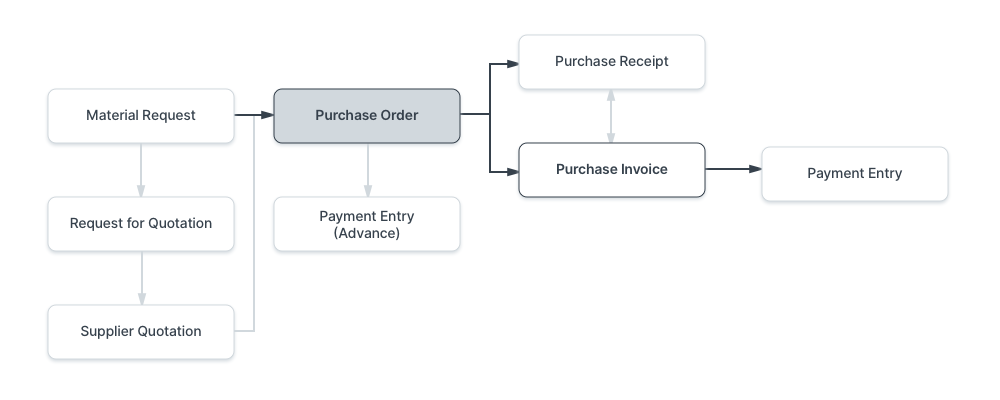
A Purchase Order can be automatically created from a Material Request or Supplier Quotation.
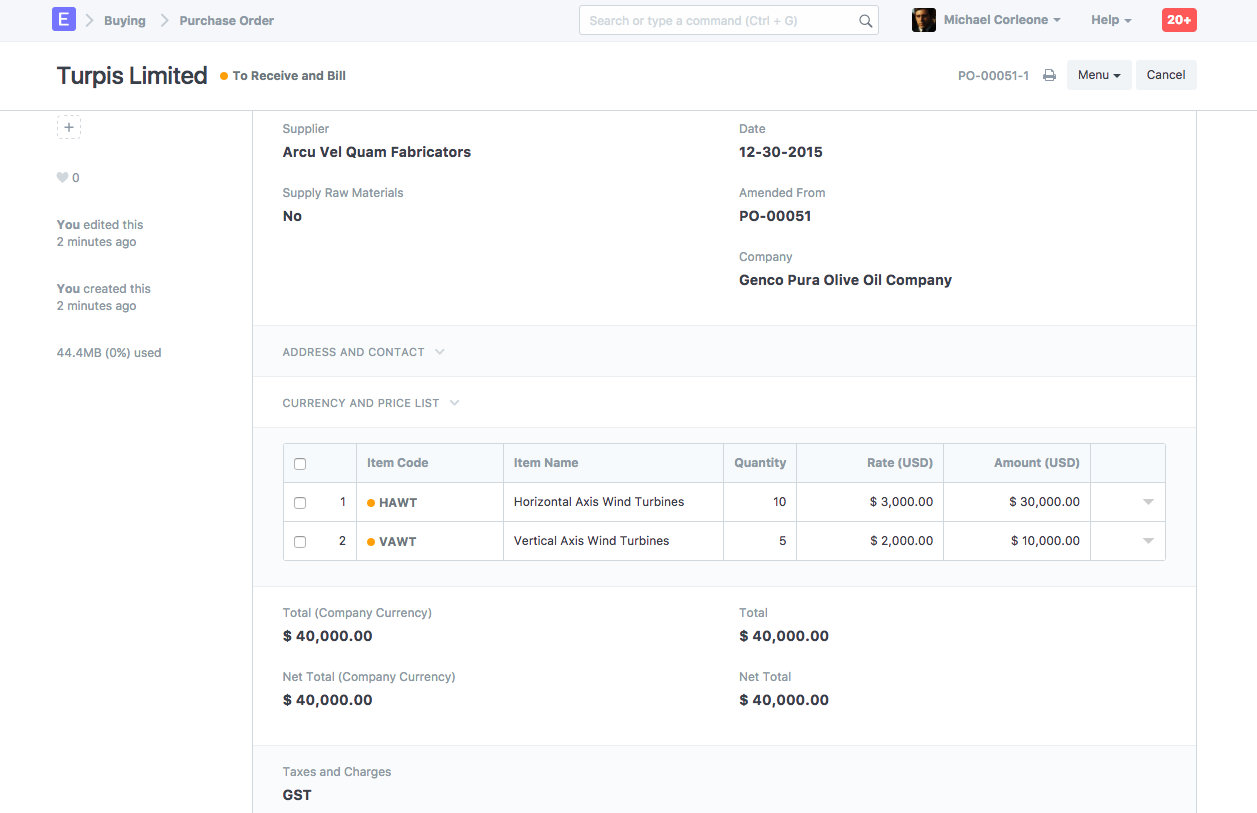
- Go to the Purchase Order list, click on New.
- Select the Supplier, required by date.
- In the items table, select the item by code, you can change the required by date for each item.
- Set the quantity and the price will be fetched automatically if set in the Item master.
- Set taxes.
- Save and Submit.
2.1 Setting Warehouses
- Set Target Warehouse: Optionally, you can set the default target Warehouse where the purchased Items will be delivered. This will be fetched into the Item table rows.
2.2 Fetching Items from Open Material Requests
Items can be fetched into the Purchase Order automatically from open Material Requests. For this to work, the following steps need to be done:
- Select a Supplier in the Purchase Order.
- Set default Supplier in the Item form under Item Defaults.
- A Material Request needs to be present of type 'Purchase'.
- Click on the Get Items from open Material Requests button below the Supplier name. Now a dialog will appear with Material Requests containing Items for which the default Supplier is the same as the one selected in the Purchase Order. On selecting the Material Requests and clicking on Get Items, the Items will be fetched from the Material Requests.
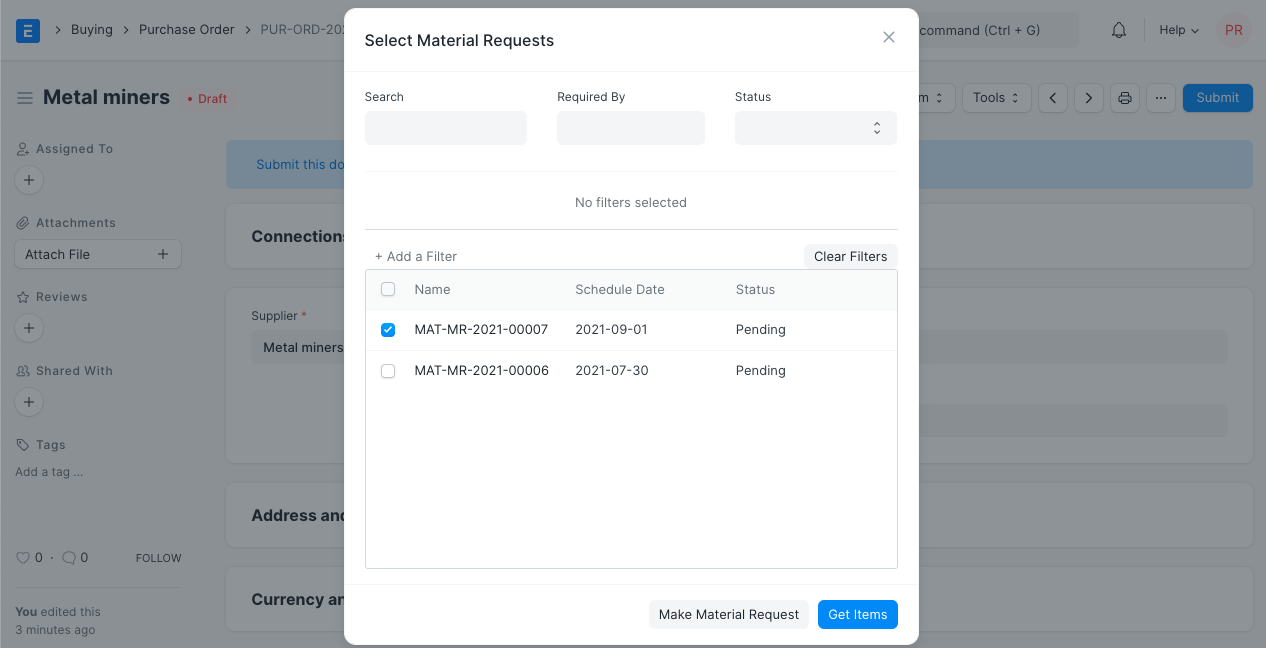
Note: The Get Items from Open Material Requests button is visible as long as the Items table is empty.
3. Features
3.1 Address and Contact
- Select Supplier Address: The Supplier's billing address.
- Select Shipping Address: The Supplier's shipping address from which they'll be sending the items.
- Address, Shipping Address, Contact, Contact Email will be fetched if saved in the Supplier master.
For India:
- Supplier and Company GSTIN: The GST Identification Number of your Supplier and your company.
- Place of Supply: For GST, Place of Supply is necessary. It consists of the state's name and number.
3.2 Currency and Price List
You can set the currency in which the purchase order is to be stored. If you set a Pricing List, then the item prices will be fetched from that list. Ticking on Ignore Pricing Rule will ignore the Pricing Rules set in Accounts > Pricing Rule.
Read about Price Lists and Multi-Currency Transactions to know more.
3.3 Subcontracting or 'Supply Raw Materials'
Setting 'Supply Raw Materials' option is useful for subcontracting where you provide the raw materials for manufacturing an item. To know more, visit the Subcontracting page.
3.4 The Items table
- Scan Barcode: You can add Items in the Items table by scanning their barcodes if you have a barcode scanner. Read documentation for tracking items using barcode to know more.
- Quantity and Rate: When you select the Item code, its name, description, and UOM will be fetched. The 'UOM Conversion Factor' is set to 1 by default, you can change it depending on the UOM received from the seller, more in the next section.
'Price List Rate' will be fetched if a Standard Buying rate is set. 'Last Purchase Rate' shows the rate of the item from your last Purchase Order. Rate is fetched if set in the item master. You can attach an Item Tax Template to apply a specific tax rate to the item. * Item weights will be fetched if set in the Item master else enter manually. * Warehouse: The warehouse where the items will be delivered, will be auto filled if 'Set Target Warehouse' was set in the Purchase Order. Via Blanket Order, a Blanket Order can be linked, to know more click here. A 'Project' can be linked to track progress. A 'BOM' or Bill of Materials can also be linked to track progress. * 'Qty as per Stock UOM' will show the current stock as per the UOM set in the Item master. 'Received Qty' will be updated when the items are billed. * Accounting Details: This section is auto filled for a Purchase Order. 'Expense Account' is the account against which the PO is billed, and Cost Center is the CC against which the PO is charged.
A “Required By” date on each Item: If you are expecting part delivery, your Supplier will know how much quantity to deliver at which date. This will help you from preventing over-supply. It will also help you to track how well your Supplier is doing on timeliness.
Allow Zero Valuation Rate: Ticking on 'Allow Zero Valuation Rate' will allow submitting the Purchase Receipt even if the Valuation Rate of the Item is 0. This can be a sample item or due to a mutual understanding with your Supplier.
3.5 Raw Materials Supplied
This section appears when 'Supply Raw Materials' supplied is set to 'Yes'. This section shows a table with the Items to be supplied to the Supplier for the subcontracting process.
- Set Reserve Warehouse: When Subcontracting, the raw materials can be reserved in a separate Warehouse. On selecting the Reserved Warehouse here, it'll be fetched into Item rows of the Raw Materials Supplied table.
Supplied Items Table
- Required Quantity: The count of Items required to complete the subcontracting as specified in the BOM.
- Supplied Quantity: This will be updated when you create Stock Entries to transfer materials to Supplier Warehouse from the Reserve Warehouse using the Transfer button.
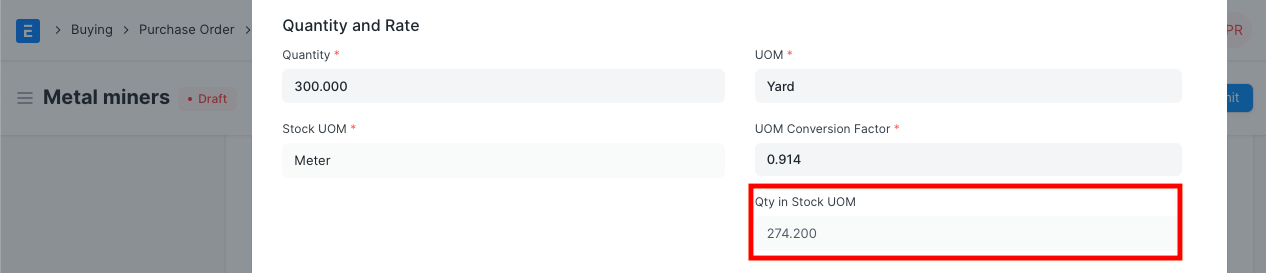
3.6 Purchase UOM and Stock UOM Conversion
You can change your UOM as per your stock requirements in the Purchase Order.
For example, if you have bought your raw material in large quantities with UOM - boxes and wish to stock them in UOM - Nos; you can do so while making your Purchase Order.
- Store UOM as Nos in the Item master. Note that the UOM in the Item master is the stock UOM.
- In the Purchase Order mention UOM as Box. (Since material arrives in Boxes)
- In the Warehouse and Reference section, the UOM will be pulled in as Nos (from the Item form):
 4. Mention the UOM conversion factor. For example, (1); If one box has 1 kilo.
5. Notice that the stock quantity will be updated accordingly.
4. Mention the UOM conversion factor. For example, (1); If one box has 1 kilo.
5. Notice that the stock quantity will be updated accordingly.
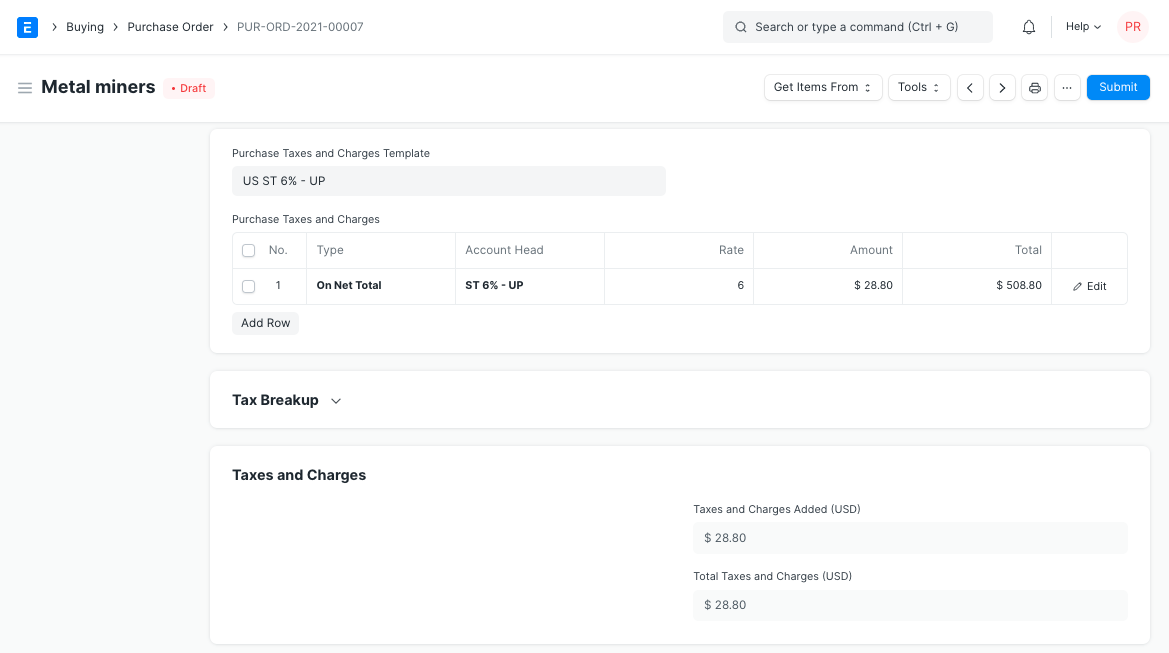
3.7 Taxes and Charges
If your Supplier is going to charge you additional taxes or charge like a shipping or insurance charge, you can add it here. It will help you to accurately track your costs. Also, if some of these charges add to the value of the product you will have to mention them in the Taxes table.
Visit the Purchase Taxes and Charges Template page to know more about taxes.
The total taxes and charges will be displayed below the table.
To add taxes automatically via a Tax Category, visit this page.
Make sure to mark all your taxes in the Taxes and Charges table correctly for an accurate valuation.
Shipping Rule
A Shipping Rule helps set the cost of shipping an Item. The cost will usually increase with the distance of shipping. To know more, visit the Shipping Rule page.
For example, you buy Items worth X and sell them for 1.3X. So, your Customer pays 1.3 times the tax you pay your Supplier. Since you have already paid tax to your Supplier for X, what you owe your government is only the tax on 0.3X.
This is very easy to track in ERPNext since each tax head is also an Account. Ideally you must create two Accounts for each type of VAT you pay and collect, “Purchase VAT-X” (asset) and “Sales VAT-X” (liability), or something to that effect.
3.8 Additional Discount
Other than recording discount per item, you can add a discount to the whole purchase order in this section. This discount could be based on the Grand Total i.e., post-tax/charges or Net total i.e., pre-tax/charges. The additional discount can be applied as a percentage or an amount.
Read Applying Discount for more details.
3.9 Payment Terms
Sometimes payment is not done all at once. Depending on the agreement, half of the payment may be made before shipment and the other half after receiving the goods/services. You can add a Payment Terms template or add the terms manually in this section.
Read Payment Terms to know more.
3.10 Terms and Conditions
In Sales/Purchase transactions there might be certain Terms and Conditions based on which the Supplier provides goods or services to the Customer. You can apply the Terms and Conditions to transactions to transactions and they will appear when printing the document. To know about Terms and Conditions, click here
3.11 Print Settings
Letterhead
You can print your request for quotation / purchase order on your company's letterhead. Know more here.
'Group same items' will group the same items added multiple times in the items table. This can be seen when your print.
Print Headings
Titles of your documents can be changed. Know more here.
The seller's Additional Discount, Payment Terms, Terms and Conditions can be recorded in your Purchase Order.
3.12 More Information
This section shows the status of the Purchase Order, percentage of items received, and percentage of items billed. If this is an Inter-Company Order, the Sales Order can be linked here.
3.13 After Submitting
Once you “Submit” your Purchase Order, you can trigger actions these actions:
- You can Add, Update, Delete items in the Purchase Order by clicking on the Update Items button. However, you cannot delete items which has already been received.
- Status: Once submitted, you can hold a Purchase Order or Close it.
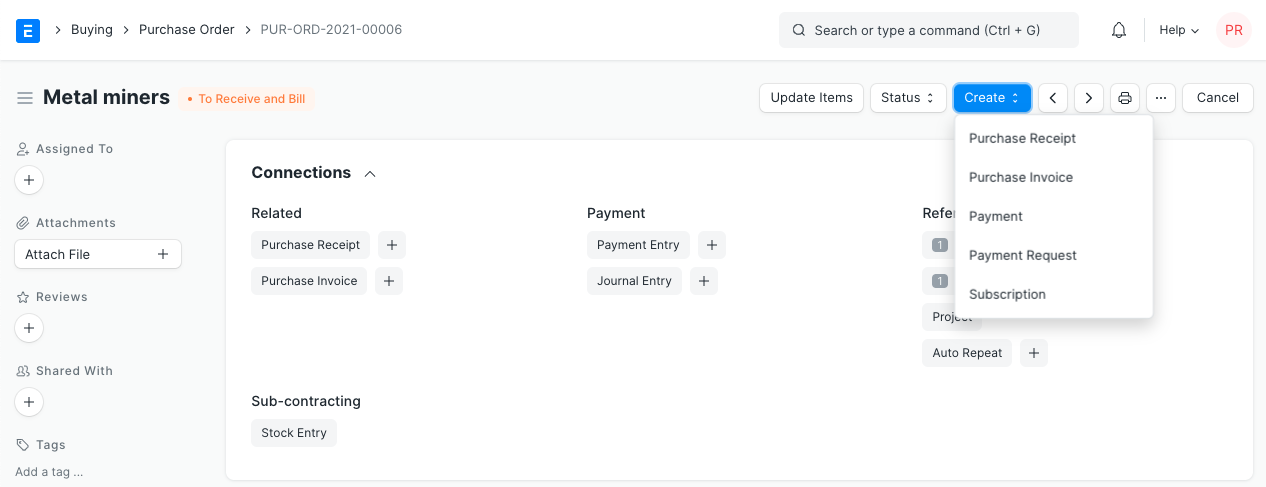
Create: From a submitted Purchase Order, you can create the following:
- Purchase Receipt - A receipt indicating you've received the items.
- Purchase Invoice - An invoice/bill for the purchase order.
- Payment Entry - A payment entry indicates that payment has been made against a purchase order.
- Journal Entry - A Journal Entry is recorded in the general ledger.