Lead
A lead is a potential customer who might be interested in your products or services.
To get the customer through the door, you may be doing all or any of the following:
- Listing your product on directories.
- Maintaining an updated and searchable website.
- Meeting people at trade events.
- Advertising your products or services.
When you send out the word that you are around and have something valuable to offer, people will come in to check out your products. These are your Leads.
They are called Leads because they may lead you to a sale. Sales executives usually work on leads by calling them, building a relationship and sending information about products or services. It is important to track all this conversation to enable another person who may have to follow-up on that contact. The new person is then able to know the history of that particular Lead.
To access the Lead list, go to:
Home > CRM > Sales Pipeline > Lead
1. How to Create a Lead
- Go to the Lead list and click on New.
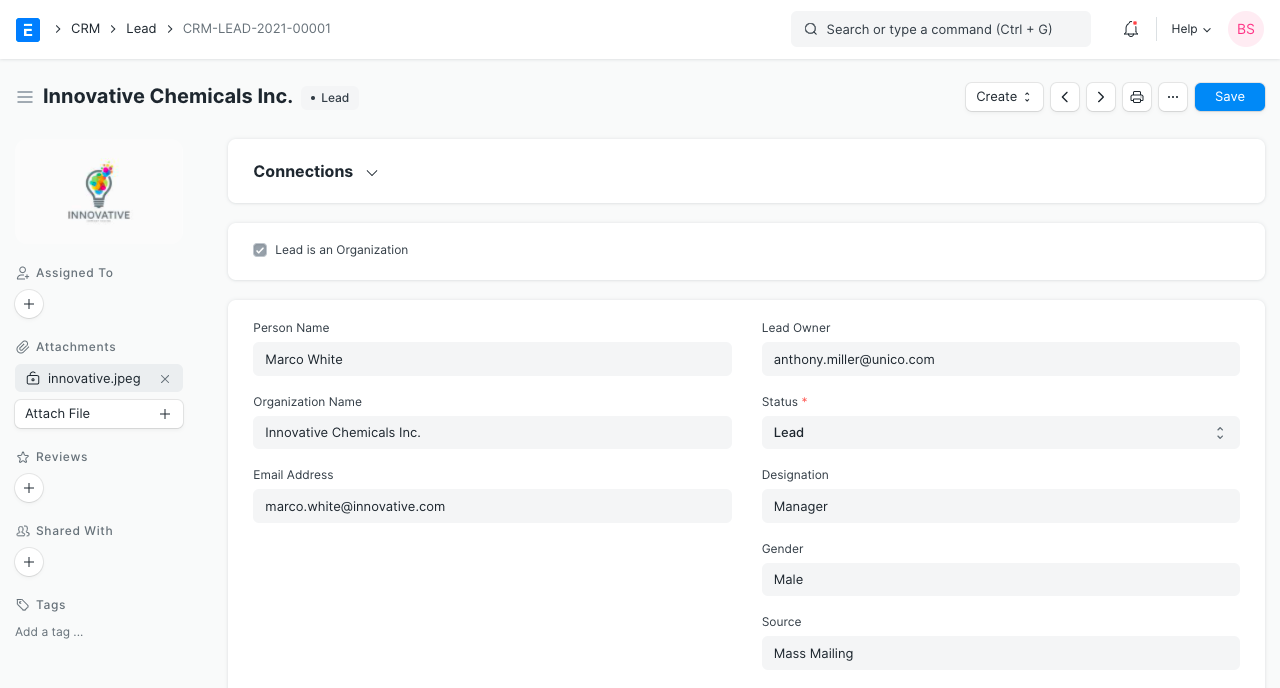
- If the person represents an organization, check the 'Lead is an Organization' checkbox. Notice that when you check, the 'Company Name ' field becomes mandatory. Enter the Company Name.
- If the person is an individual, leave the checkbox unchecked and enter Person Name and Gender.
- Enter the 'Email Address'.
Status is the important field in the Lead. You can set the status manually and also it will be updated automatically based on your actions against the lead.
- Lead: This is the default status assigned when a Lead is created and it indicates an action is needed against this Lead.
- Open: Sales executive needs to contact the Lead.
- Replied: A sales executive has provided the information needed and response from Lead is awaited.
- Opportunity: If an Opportunity is created against the Lead, the status is set to Opportunity. It indicates that the Lead is qualified and may lead to sales.
- Quotation: If a quotation is created against a Lead, then the status is set to Quotation.
- Lost Quotation: If the quotation given to the lead has been marked as lost, then the status is set to 'Lost Quotation'.
- Interested: The lead is interested in the products or services.
- Converted: If the quotation given to the Lead has resulted in confirmation of an order and if the Sales Order has been created against the quotation, then the status is set to Converted.
- Do Not Contact: Lead is not interested and no further communication is needed.
- You can set the Lead Source in Source field.
- Enter email ID for communication.
- Click on 'Save'.
You can also record the details of the conversation in the NOTES section.
Further details like Lead Type, Market Segment, Industry can be added in the 'MORE INFORMATION' section.
If you have a healthy number of leads, all this information will help you prioritize the leads you can pursue.
You can assign the Lead to a user by clicking on 'Assign' button on left bar. You can also attach files/images by clicking on 'Attach File' button.
2. Features
2.1 Reminders to Follow Up on the Leads
It is important to reach out to leads from time to time and build the relationship. You can create a calendar event from the Activities tab for the user and a notification will be shown on that date.
2.2 Adding Multiple Contacts and Addresses
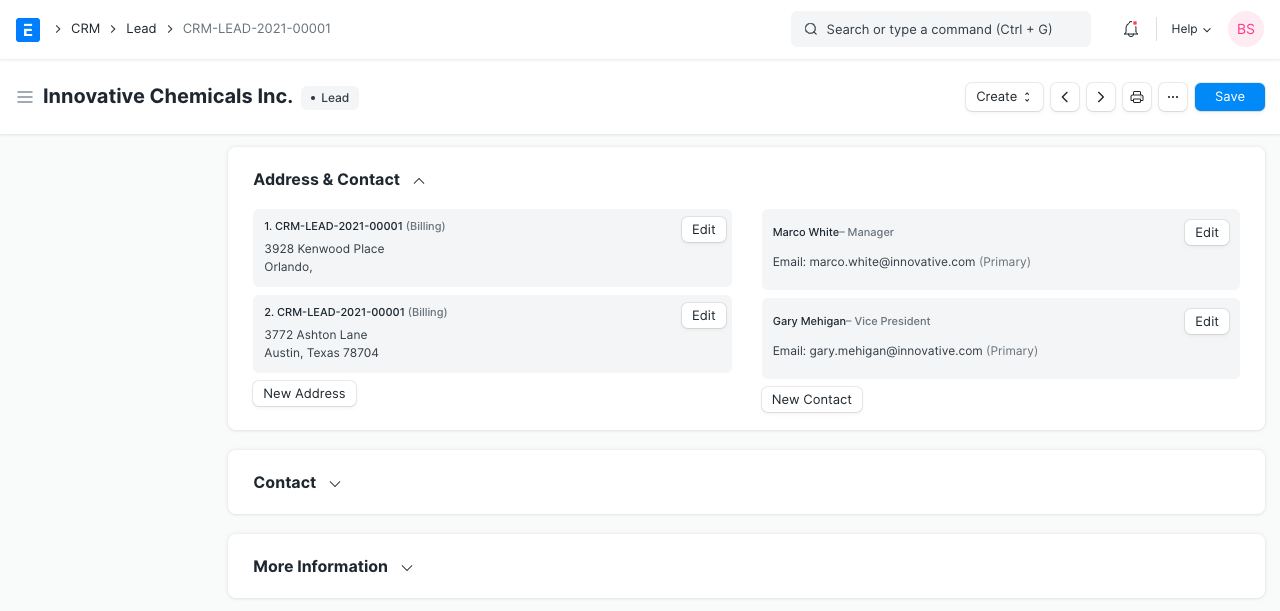
In Busines-to-business(B2B) scenario, in order to close a sales deal, you will have to contact multiple people working in the prospective company. You can add the details of all such people in the same lead. Once you save a Lead, you will get the option to add Contact details by clicking on 'New Contact' button. Similarly, you can add the Address details by clicking on 'New Address'.
2.3 Recording Comments, Emails and Events
- Comments: You can write your comment in 'Add a comment' box and click on 'Comment'.
- Emails: You can send an email to the lead by clicking on the 'New Email' button and when the lead responds to your email, it will be appended to your email creating an email thread.
- Events: You can also records the Meetings, Calls etc you have had with the Lead by clicking on 'New Event'
2.4 Creating Opportunity, Customer and Quotation
You can create an Opportunity, Customer or a Quotation from the Make dropdown. Relevant field values will be copied over.
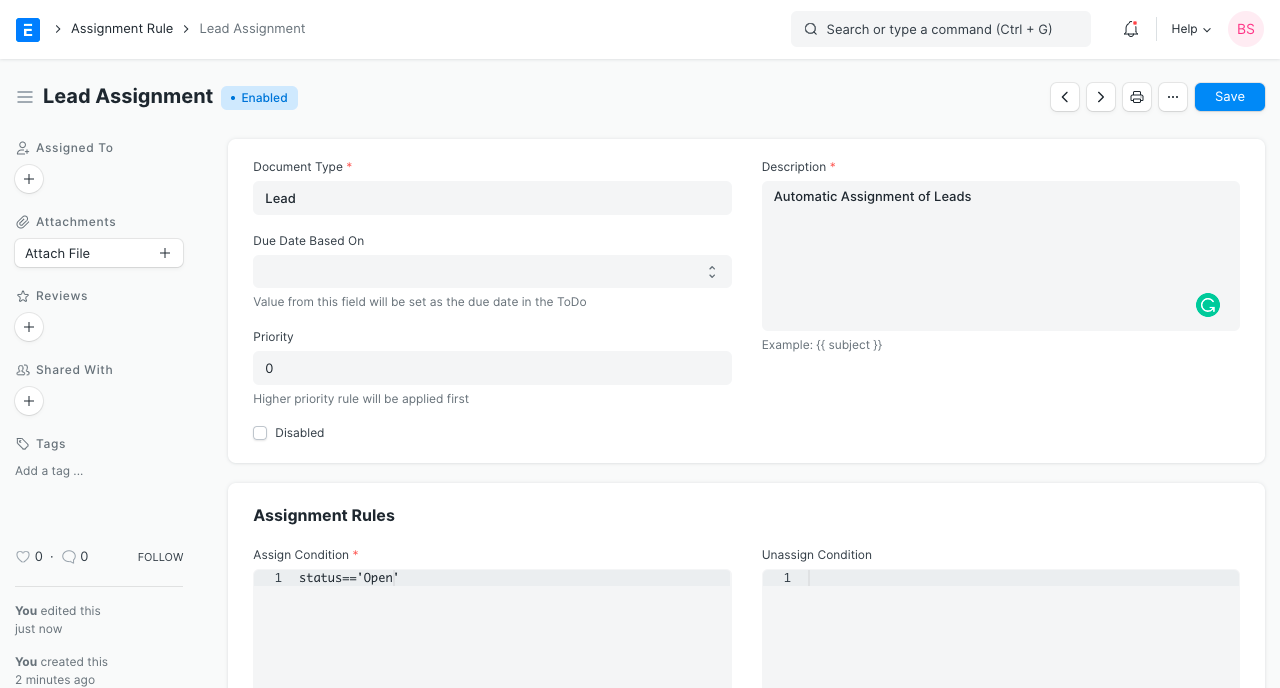
2.5 Auto-assigning the Leads to Sales Executives
Introduced in Version 12
You can define Assignment Rules to automatically assign the leads to sales executives.
3. Adding Custom Fields
You may need to add custom fields to capture additional details as per your needs.
You can customize the Lead DocType using Customize Form tool.