Process Statement Of Accounts
Introduced in Version 13
Process Statement Of Accounts is a tool which helps you send Statement Of Accounts (General Ledger Report) and Ageing (Accounts Receivable Summary) Report as a PDF to your customers in bulk via email either manually or automated periodically.
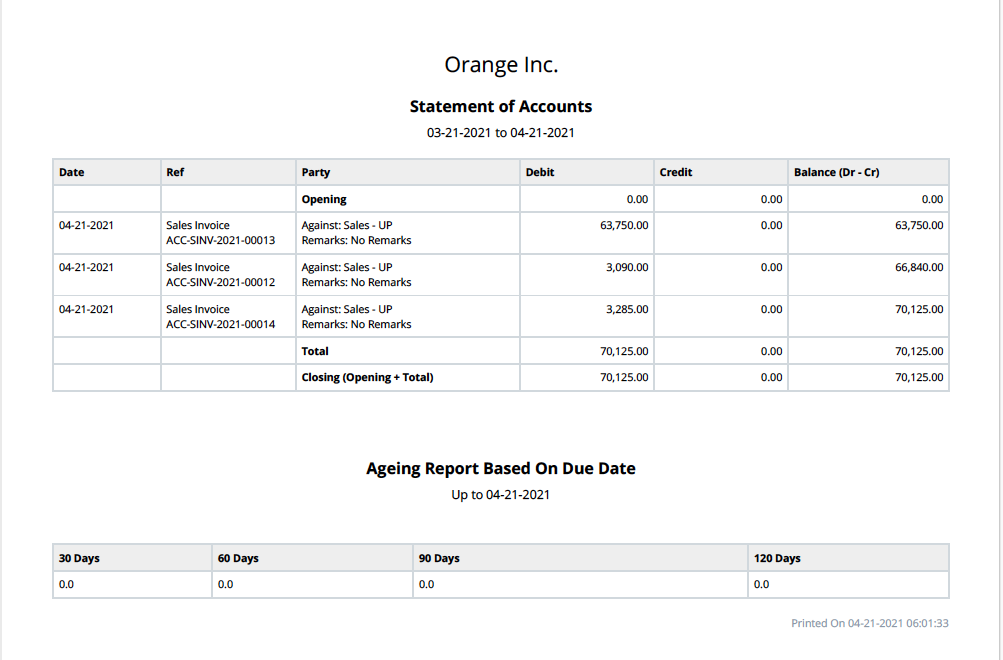
This feature is useful when you want to send email updates to customers periodically about their transactions (like Sales Invoices). In the PDF attachment sent via emails sent to the customers, for each customer, there will be details like invoice posting date, Sales Invoice number, debit and credit details, etc relevant to their account.
The purpose of this feature is remind multiple customers that they have pending unpaid invoices.
To access Process Statement Of Accounts list you can either search in the navbar or go to:
Home > Accounting > Tools > Process Statement Of Accounts
1. Prerequisites
The tool uses the email IDs of customers to send them the reports. On not finding the below email entries in the Customer contacts the tool won't allow you to select the respective Customer, so please ensure the following details are filled in the Customer documents.
- Billing Email of Customer: This is mandatory and can be set within the Customer Contact with "Is Billing Contact" option checked.
- Primary Email of Customer: This is not mandatory, unless you select the "Send To Primary Contact" in the form.
Email Account setup with outgoing enabled. Learn more about this here.
2. How to create a Process Statement Account entry
Go to the "Process Statement Of Account" list view by searching in the navbar and click on "New".
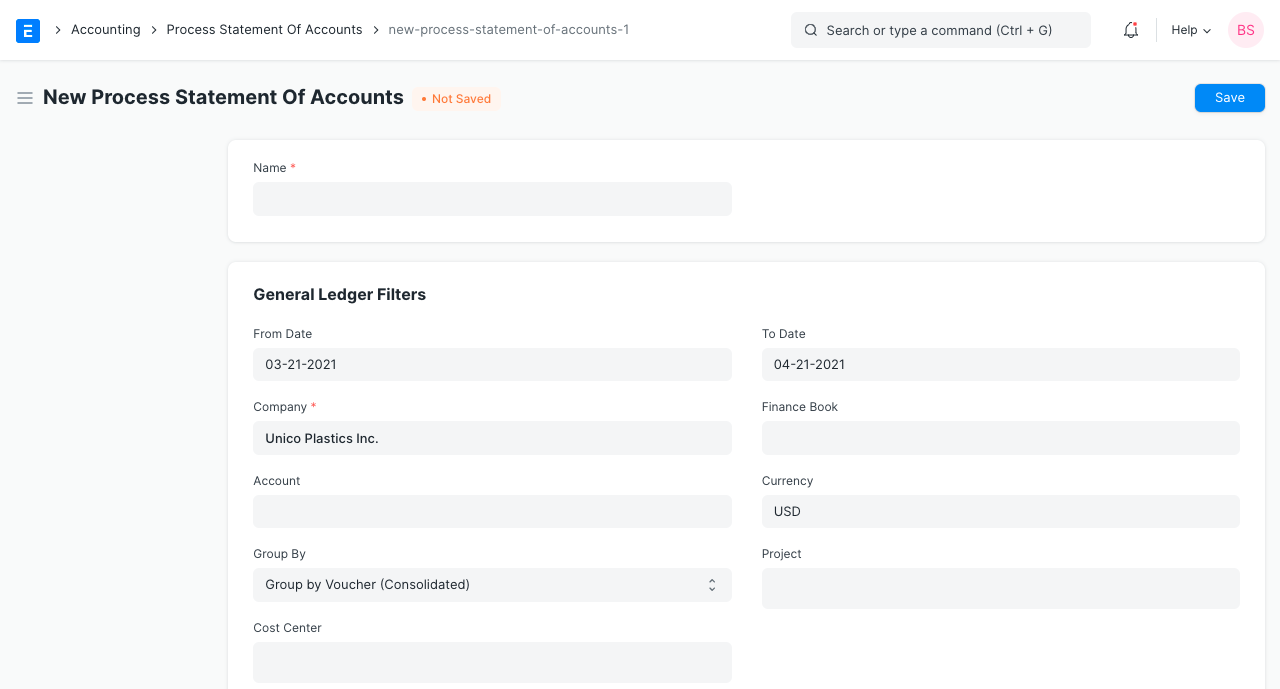
Enter a name for the entry, for future reference.
Set the General Ledger filters for the statements which will be sent to the customers.
- "From Date" and "To Date" filters will be hidden and auto-filled dynamically when "Enable Auto Email" option is selected.
- "Project" and "Cost Center" are Table MultiSelect fields. Meaning you can select multiple Projects and Cost Centers in the General Ledger filters.
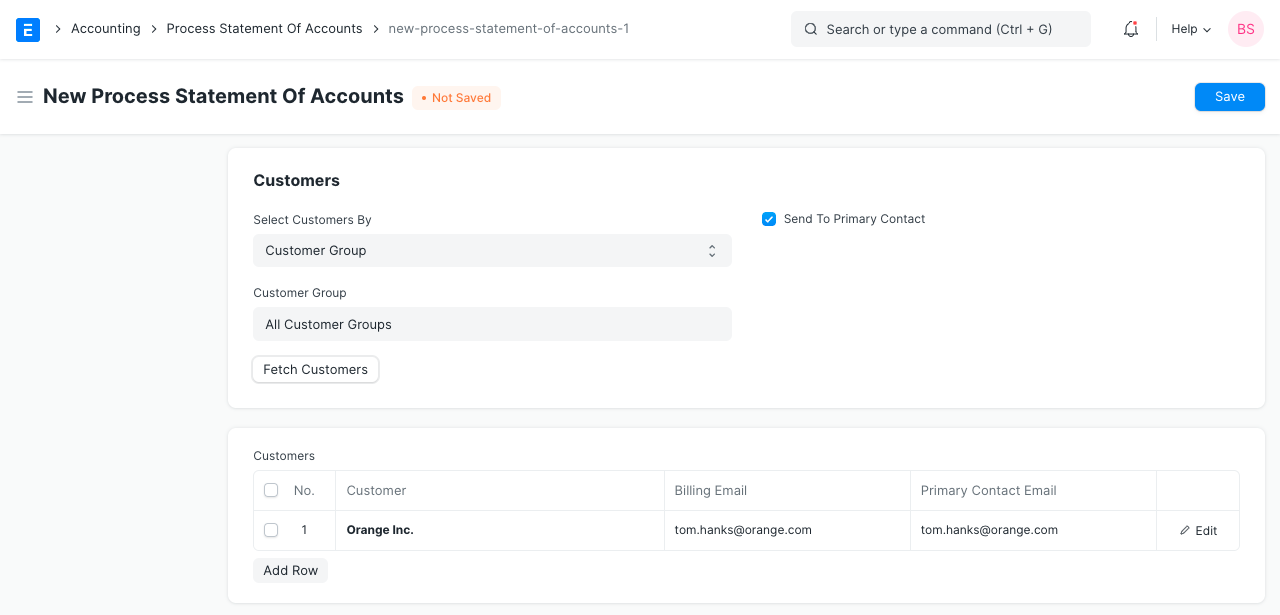
In the "Customers" section, you have an option to select customers in the child table and fetch their primary and billing emails.
- The "Select Customer By" field lets you select customers in bulk, by grouping them based on "Customer Group", "Territory", "Sales Partner", and "Sales Person" by entering the selection and clicking on "Fetch Customers".
- In tree doctypes like "Territory", "Sales Person", and "Customer Group" on selecting group values, the customers having the child values of these fields will also be fetched. So when you select "India" as territory in the form, all customers with "Territory" values under India in the Territory tree will get selected.
- The "Send To Primary Contact" option will send the Statement Of Account to the primary contact email IDs of the customers too apart from the billing email.
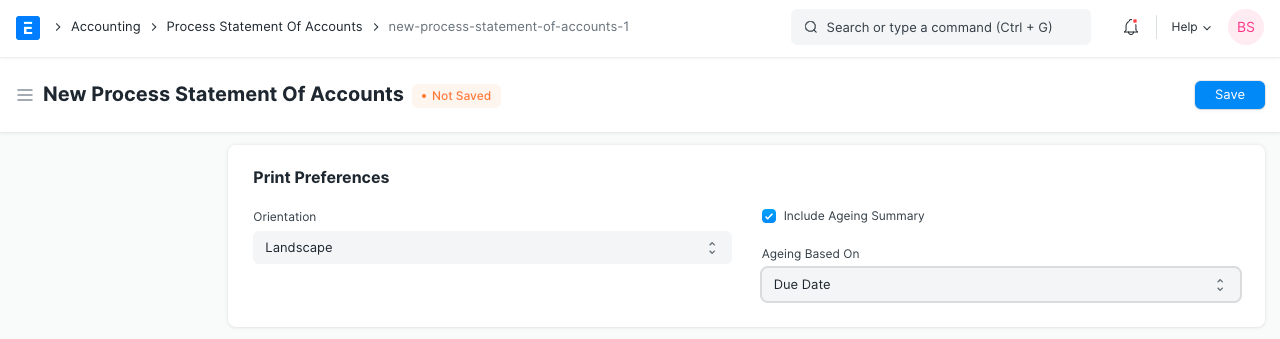
In "Print Preferences" section you can select 2 things:
- Print orientation of the PDF file, either "Landscape" or "Portrait".
- Whether you want to see the ageing report (Accounts Receivable Summary report), which shows the ageing amount for 30/60/90/120 days for vouchers (like Sales Invoice), based on either "Due Date" or "Posting Date".
The "Email Settings" section lets you configure how you want the emails to be sent. There are two subsections in this:
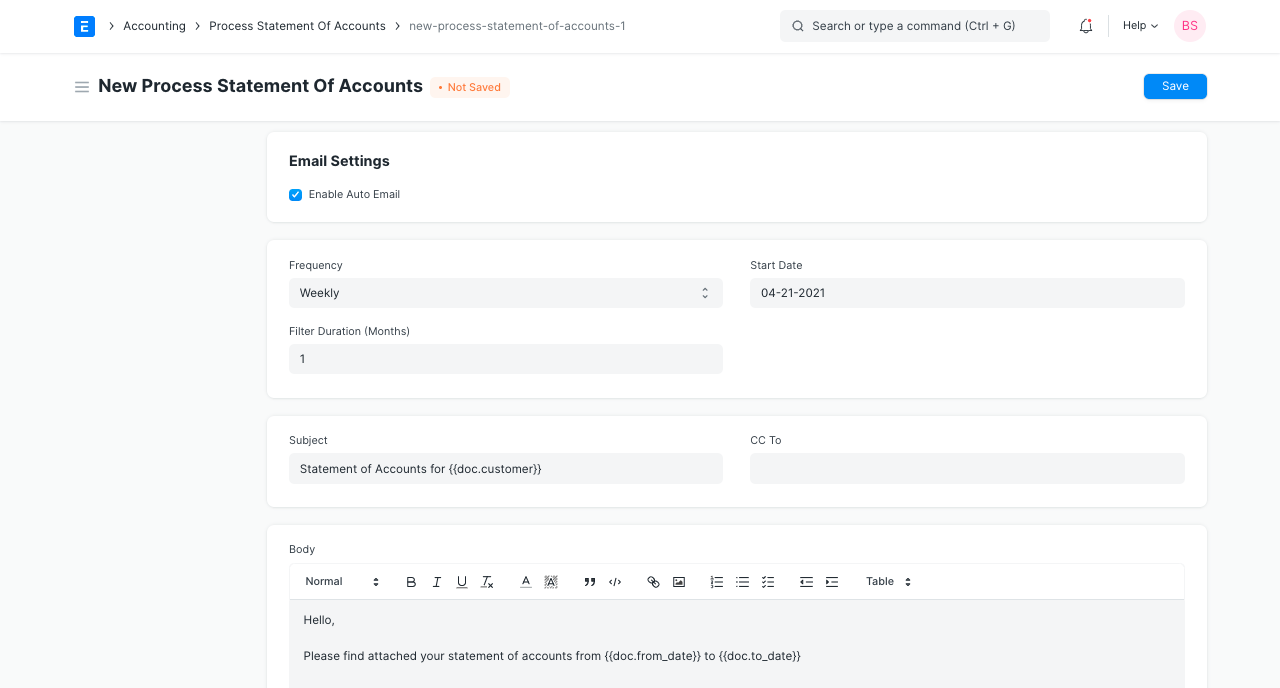
- On selecting "Enable Auto Email" you will see the options to send automated periodic reports to the customers in the entry.
- You can select the "Frequency" at which the emails will be sent after the "Start Date" to the customers. The available options are weekly, monthly, and quarterly.
- You can also select the "Filter Duration" in months. For example, if you set "Filter Duration" as '3', you'll get the reports for the last three months counting from the current date. Here, current date refers to the date on which the emails are sent.
- These mails are not sent right away, but at midnight as a background process.
- After this you can select the "Subject", "CC To", and "Body" fields of the email. If you don't set values to this field, default values will be set like shown below.
Review your settings and click on "Save".
Now, wait for the emails to get sent if you've enabled "Enable Auto Email" or click on Send Emails to send them immediately.
3. Features
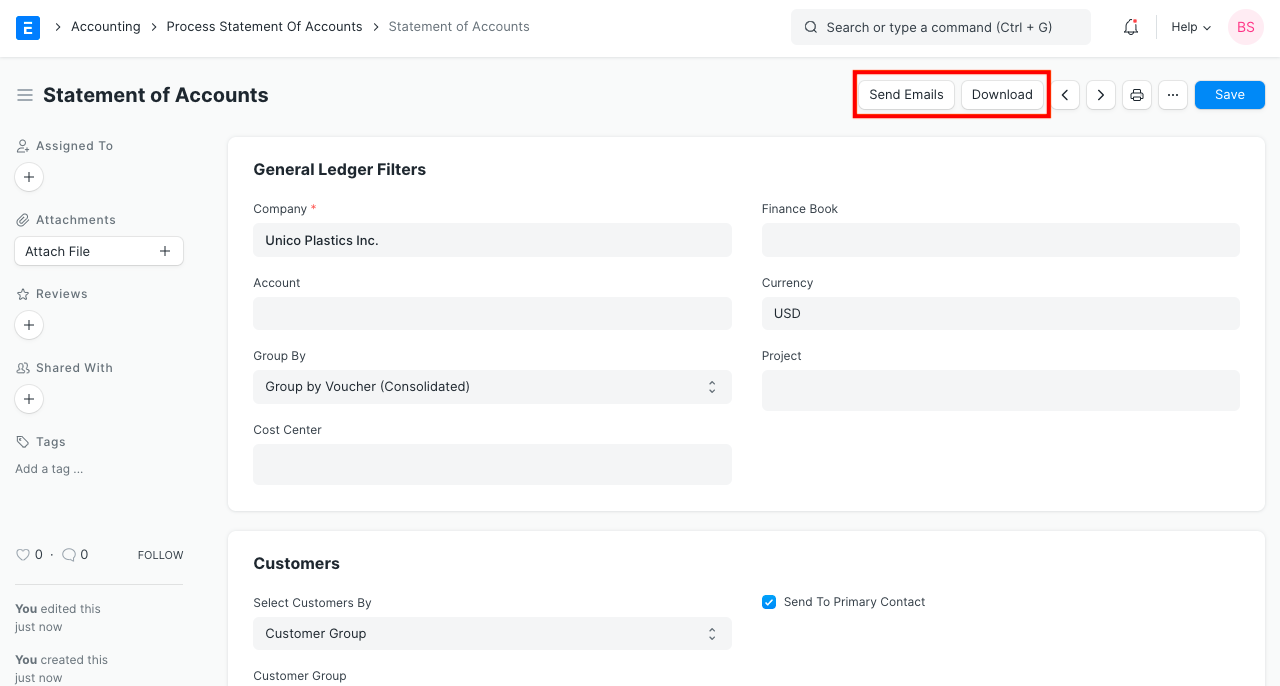
3.1 Download consolidated PDF of all customers
On creating an entry, there is a button seen at the top called "Download" which lets you see the consolidated report PDF of all customers. You can use this for reviewing.
3.2 Send emails manually
On creating an entry, there is a button seen at the top called "Send Emails" which lets you trigger email sending manually to the customers. The emails are queued via a background job, which you can track in the "Email Queue" doctype with the DocType and Document references. You can do this even if "Enable Auto Email" is on.
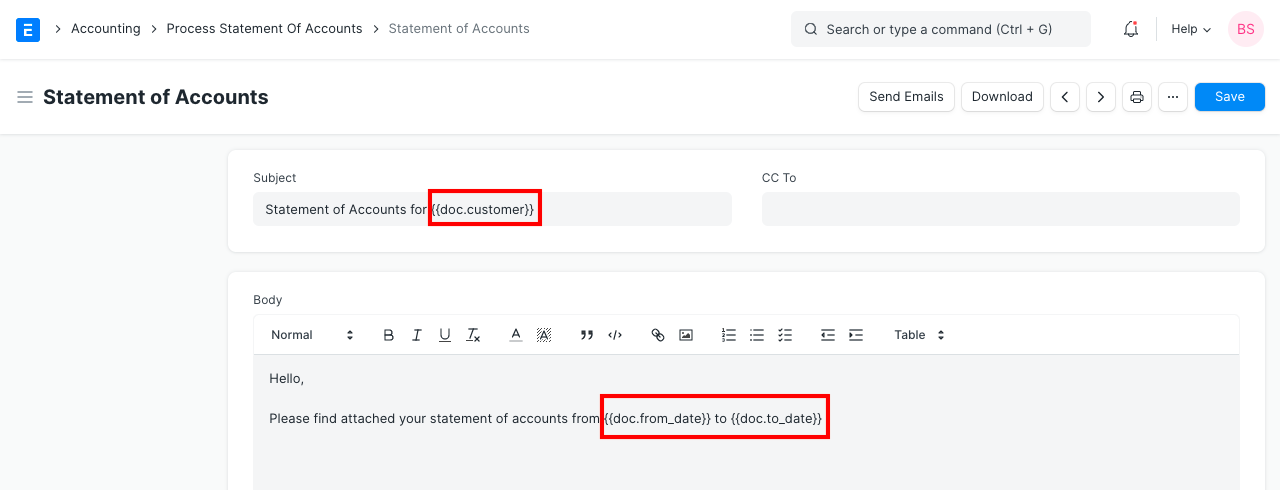
3.3 Using dynamic values in the Email Subject and Body
You can use Jinja tags to enter dynamic values from:
- The customer to which the email will be sent to under the "customer" object
- Any field in the selected Process Statement Of Account document under the "doc" object
- Any method in
frappe.utilsunder the "frappe" object
They can be used as shown below:
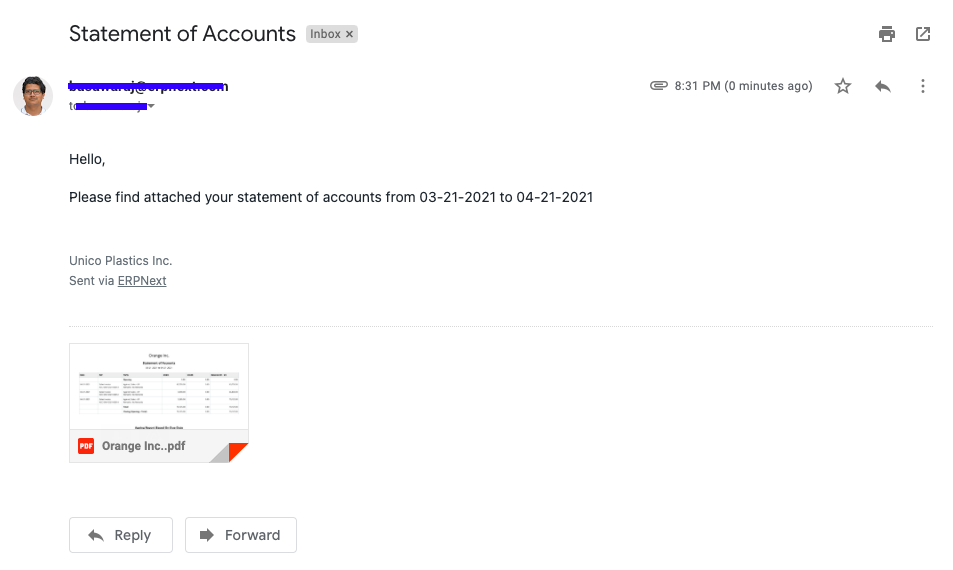
Resulting Email:
Report PDF: