Accounts Settings
ERPNext allows you to configure some aspects of Accounting as per your business rules. This page will help you understand how you can leverage this to cater to various scenarios encountered by you.
Transactions Settings
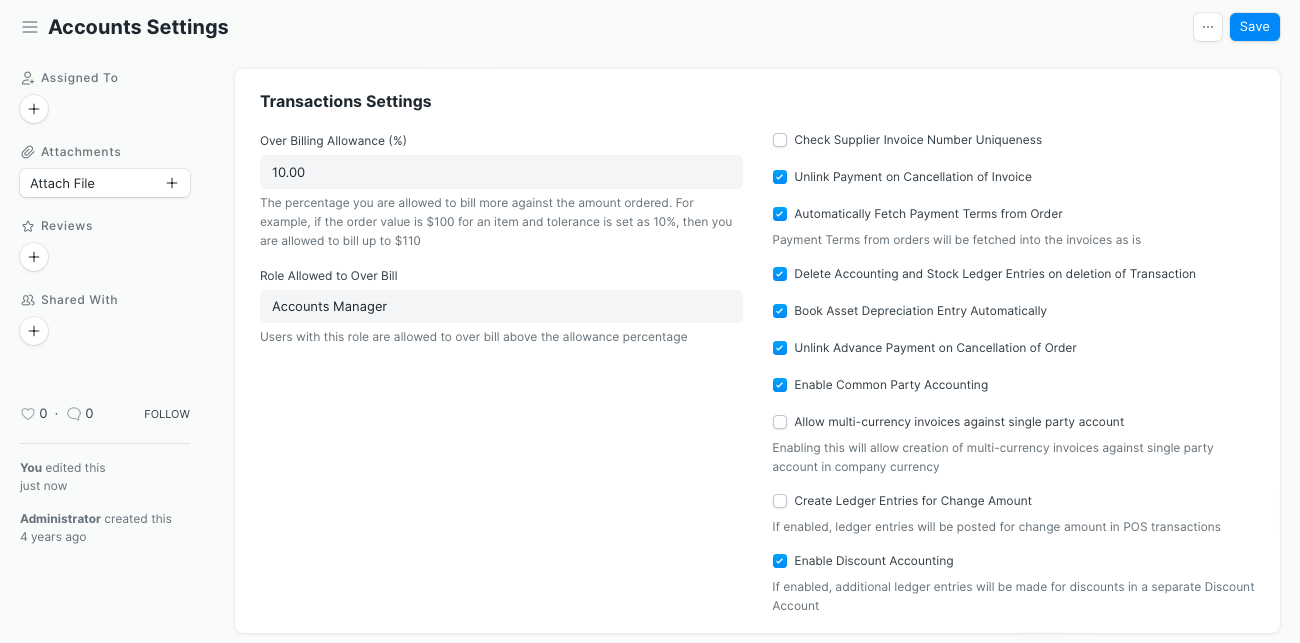
1. Over Billing Allowance (%)
The percentage by which you can overbill transactions. For example, if the order value is $100 for an Item and percentage here is set as 10% then you are allowed to bill for $110.
2. Role Allowed to Over Bill
Users with this role are allowed to over bill above the allowance percentage.
3. Check Supplier Invoice Number Uniqueness
When checked, Purchase Invoices with same 'Supplier Invoice No' will not be allowed. This is useful to avoid duplicate entries.
4. Unlink Payment on Cancellation of Invoice
If checked, system will unlink the payment against the respective invoice. By default, if a Payment Entry is submitted, the linked invoice cannot be canceled until the Payment Entry is also canceled. On unlinking, you can now cancel and amend the invoices. But the payments not be linked and considered as advance payments.
5. Automatically Fetch Payment Terms from Order
Enabling this will automatically fetch the Payment Terms from a Purchase/Sales Order to its linked Purchase/Sales Invoice.
6. Delete Accounting and Stock Ledger Entries on deletion of Transaction
Enabling this will allow the deletion of linked General Ledger and Stock Ledger Entries on deleting invoices and receipts. This can be checked if you don't want to lose the document ID after cancelling the document. You can now cancel and delete the document to get the same document ID again.
7. Book Asset Depreciation Entry Automatically
When checked, an automatic entry for an asset depreciation will be created based on the first date set. For example, yearly depreciation for an item will be scheduled for the next 3/4 years based on the Number of Depreciations Booked set in the Asset master. For more details, visit the Asset Depreciation page.
8. Unlink Advance Payment on Cancellation of Order
Similar to the previous option, this unlinks any advance payments made against Purchase/Sales Orders.
9. Enable Common Party Accounting
If checked, an adjustment Journal Entry will be posted automatically on creation of Sales/Purchase Invoices against common Customer & Supplier. For more details, visit Common Party Accounting
10. Allow multi-currency invoices against single party account
Enabling this will allow creation of multi-currency invoices against single party account in company currency.
11. Create Ledger Entries for Change Amount
If checked, for a Point of Sale invoice, the system will post ledger entries considering the change amount given.
12. Enable Discount Accounting
If checked, Discount Accounts can be added in the Items table of Sales Invoices, which will allow you to account for Discounts applied on Items more efficiently. It also lets you add Default Discount Accounts for Items, which will be fetched automatically when the Item is added to a Sales Invoice.
Tax Settings

1. Determine Address Tax Category From
Tax category can be set on Addresses. An address can be Shipping or Billing address. Set which addres to select when applying Tax Category.
2. Automatically Add Taxes and Charges from Item Tax Template
Enabling this will populate the Taxes table in transactions if an Item Tax Template is set for an Item and that Item is selected in the transaction.
3. Book Tax Loss on Early Payment Discount
Enabling this will split the Payment Entry discount deductions into Income Loss and Tax Loss if the document against the Payment Entry has an Early Payment Discount set.
Period Closing Settings
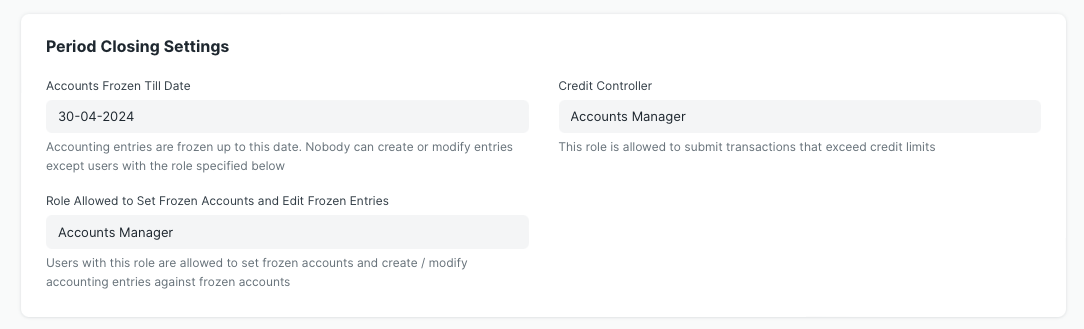
1. Accounts Frozen Till Date
Freeze accounting transactions up to specified date, nobody can make/modify entry except the specified Role.
2. Role Allowed to Set Frozen Accounts and Edit Frozen Entries
Users with this Role are allowed to set frozen accounts and create/modify accounting entries against frozen accounts.
3. Credit Controller
This role is allowed to submit transactions that exceed credit limit.
Deferred Accounting Settings
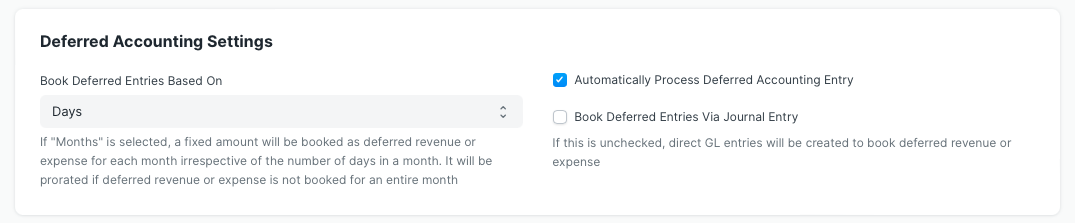
1. Book Deferred Entries Based On
Deferred revenue amount can be booked based on two criteria. The default option here is "Days". If "Days" is selected, the deferred revenue amount will be booked based on the number of days in each month and if "Months" is selected, then it will be booked based on number of months. For Eg: If "Days" is selected and $12000 revenue has to be deferred over a period of 12 months, then $986.30 will be for the month having 30 days and $1019.17 will be booked for the month having 31 days. If "Months" is selected, $1000 deferred revenue will booked each month irrespective of the number of days in a month.
2. Automatically Process Deferred Accounting Entry
This setting is enabled by default. In case you don't want the deferred accounting entries to be posted automatically you can disable this setting. If this setting is disabled deferred accounting will have to be processed manually using Process Deferred Accounting
3. Book Deferred Entries Via Journal Entry
By default Ledger Entries are posted directly to book deferred revenue against an invoice. In order to book this deferred amount posting via Journal Entry, this option can be enabled.
Print Settings

1. Show Inclusive Tax In Print
It allows you to display the tax amounts inclusive of the item prices on printed documents such as invoices and sales orders.
2. Show Taxes as Table in Print
It allows you to display tax details in a tabular format on printed documents such as invoices, purchase orders, and sales orders.
3. Show Payment Schedule in Print
The Payment Schedule table is visible on using Payment Terms. Enabling this will show this table in print view.
Currency Exchange Settings

1. Allow Stale Exchange Rates
This should be unchecked if you want ERPNext to check the age of records fetched from Currency Exchange in foreign currency transactions. If it is unchecked, the exchange rate field will be read-only in documents.
Stale Days is the number of days to use when deciding if a Currency Exchange record is stale. This is valid when 'Allow Stale Rates' is disabled. So, if the Stale Days is set as 10, stale rates that are 10 days will be allowed. If Allow Stale Rates is enabled, there is no time limit on the age of stale rates.
If stale rates are enabled, the order of fetching is:
- Latest rate from Currency Exchange form
- If no Currency Exchange is found latest rate as per market is fetched automatically
If stale rates are disabled, the order of fetching is:
- Latest rate from Currency Exchange form upto number of days set in 'Stale Days'
- If no Currency Exchange is found Latest rate as per market is fetched automatically
Report Settings

1. Use Custom Cash Flow Format
You may choose to use Custom Cash Flow Formats to customize what the Cash Flow report looks like. To know more, visit here.