Work Order
A Work Order is a document given to the manufacturing shop floor by the Production Planner as a signal to manufacture a certain quantity of a certain Item.
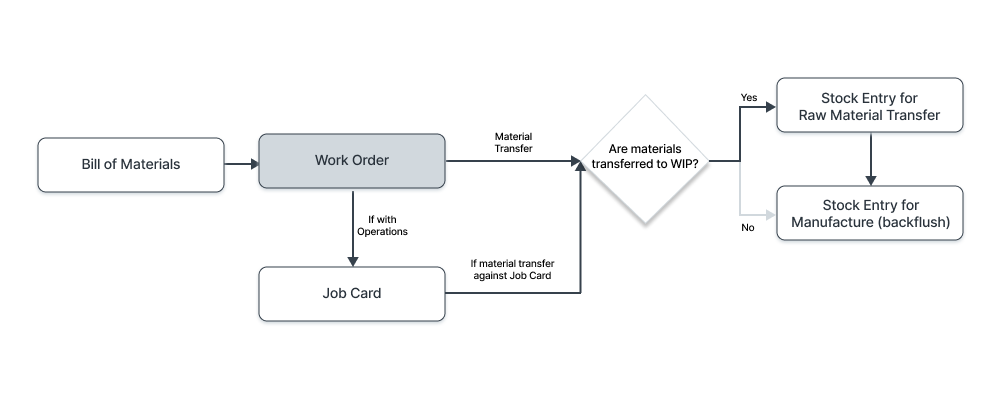
The Work Order also helps generate the material requirements (Stock Entry) for the Item to be produced from its Bill of Materials.
The Work Order can be generated from the Production Plan based on Sales Orders.
To access the Work Order list, go to:
Home > Manufacturing > Production > Work Order
1. Prerequisites
Before creating and using a Work Order, it is advised that you create the following first:
2. How to Create a Work Order
- Go to the Work Order list, click on New.
- Select the Item to be manufactured.
- The default BOM for that item will be fetched by the system. You can also change the BOM.
- Enter the quantity to manufacture. Raw material Items will be fetched only when this is set.
- If the selected BOM has Operations mentioned in it, the system will fetch all Operations from BOM, these values can be changed. Refer section 3.2 to know more.
- Set the Planned Start Date (an Estimated Date at which you want the Production to begin).
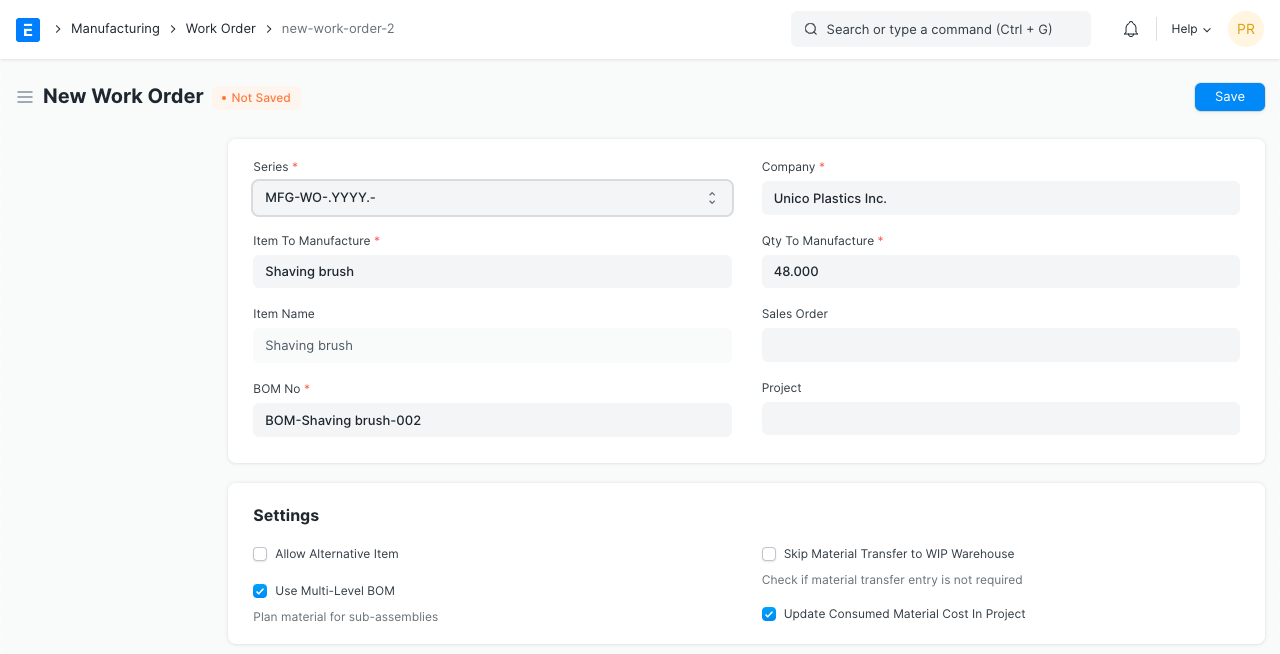
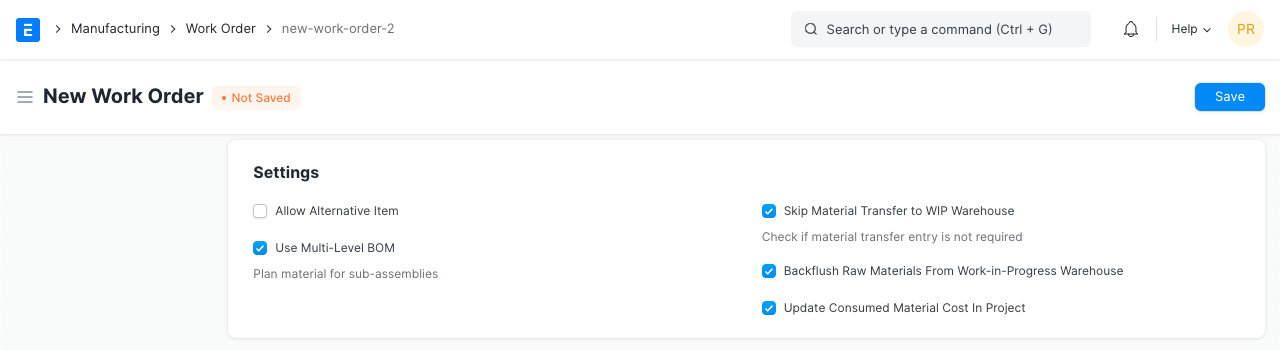
- Use Multi-Level BOM: This is enabled by default. If you want to plan materials for sub-assemblies of the Item you're manufacturing leave this enabled. If you plan and manufacture the sub-assemblies separately, you can disable this checkbox. To know more, visit this page.
Select Warehouses:
- Source Warehouses: Select this Warehouse in the Item row. The warehouse where you store your raw materials. Each required item can have a separate source warehouse. Group warehouse also can be selected as source warehouse. On submission of the Work Order, the raw materials will be reserved in these warehouses for production usage.
- Work-in-Progress Warehouse: The warehouse where your Items will be transferred when you begin production. Group Warehouse can also be selected as a Work in Progress warehouse.
- Target Warehouse: The warehouse where you store finished Items before they are shipped.
- Scrap Warehouse: If the BOM results in Scrap material, the Scrap Warehouse needs to be selected.
- Required Items: All the required items (raw materials) will be fetched from BOM and populated in this table. Here you can also change the Source Warehouse for any item. And during the production, you can track transferred raw materials from this table.
Note: You can save a Work Order without selecting the Warehouses, but Warehouses are mandatory for submitting a Work Order.
A Work Order can also be directly created from a Sales Order.
2.1 Additional Options when Creating a Work Order
- Sales Order: If you create a Work Order from a Sales Order, it will be fetched here. You can also link an existing Sales Order which has the Item to be manufactured to this Work Order.
- Project: Link the Work Order to a Project to track progress in cases like engineer to order.
- Allow Alternative Item: Sometimes when manufacturing a finished good, specific materials may not be available. For example, using plastic beads instead of plastic crystals. The finished good itself could be different. Ticking this checkbox will allow you the select an Alternative Item. To know more, visit this page.
- Skip Material Transfer to WIP Warehouse: Usually, a Stock Entry is created when the raw materials are transferred to a Work In Progress Warehouse. In this case, the raw material is considered to be consumed hence the Stock Entry is skipped. The next option will be shown if you tick this checkbox.
- Backflush Raw Materials From Work-in-Progress Warehouse: Ticking this checkbox will automatically create a Stock Entry with the type 'Manufacture'. This means that the raw materials were consumed from the Source Warehouse, used to manufacture finished goods and another Stock Entry was created for your Target Warehouse.
3. Features
3.1 Time
The Planned Start Date and Expected Delivery Date can be set here. The default for Planned Start Date is the current date and time at the time of creating the Work Order.
3.2 Required Items table
The Source Warehouse can be changed for the raw material items used here. The default Warehouse can be set at the Item level in the Item master or globally in Stock Settings.
- Required Quantity: This will be calculated automatically based on the Bill Of Materials.
- Transferred Quantity: Once the Work Order starts and Job Cards are run, items are transferred from the Source Warehouse to Work In Progress Warehouse. This field shows the quantity in the WIP Warehouse. Note that if you tick on 'Skip Material Transfer to WIP Warehouse', this column will not be updated.
- Consumed Quantity: When the Item from the WIP Warehouse is consumed and the finished product is manufactured, this field will be updated.
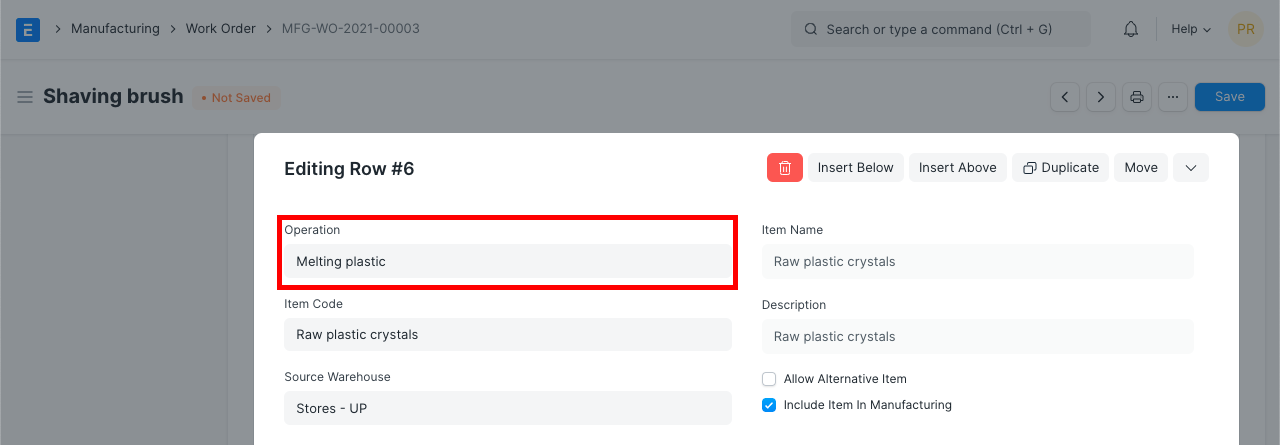
- Allow Alternative Item: If a particular Item (raw material or sub-assembly) is not available, ticking this checkbox will allow you to select an alternative item defined in the Item Alternative list.
- Skip Material Transfer: If you don't want to transfer the specific raw material to the work in progress warehouse then you need to enable this checkbox.
Once uncheck this checkbox for an Item, you can still select it in the BOM and Work Order, but no Stock Entries will be created against it.
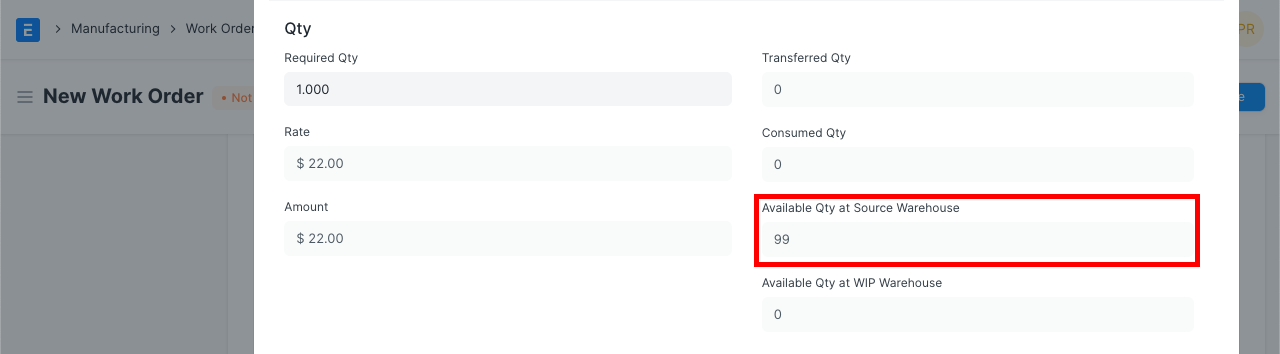
Once the Work Order is saved the following two fields will also show the availability in the respective Warehouses in the Required Items table:
- Available Qty at Source Warehouse
- Available Qty at WIP Warehouse
3.2 Operations table
Materials can be transferred against a Work Order or a Job Card. This is usually fetched from the Bill Of Materials, but you can change it in the Work Order also.
The following will be fetched from the BOM:
- In the Operations table: The Workstations where the Operations will be performed
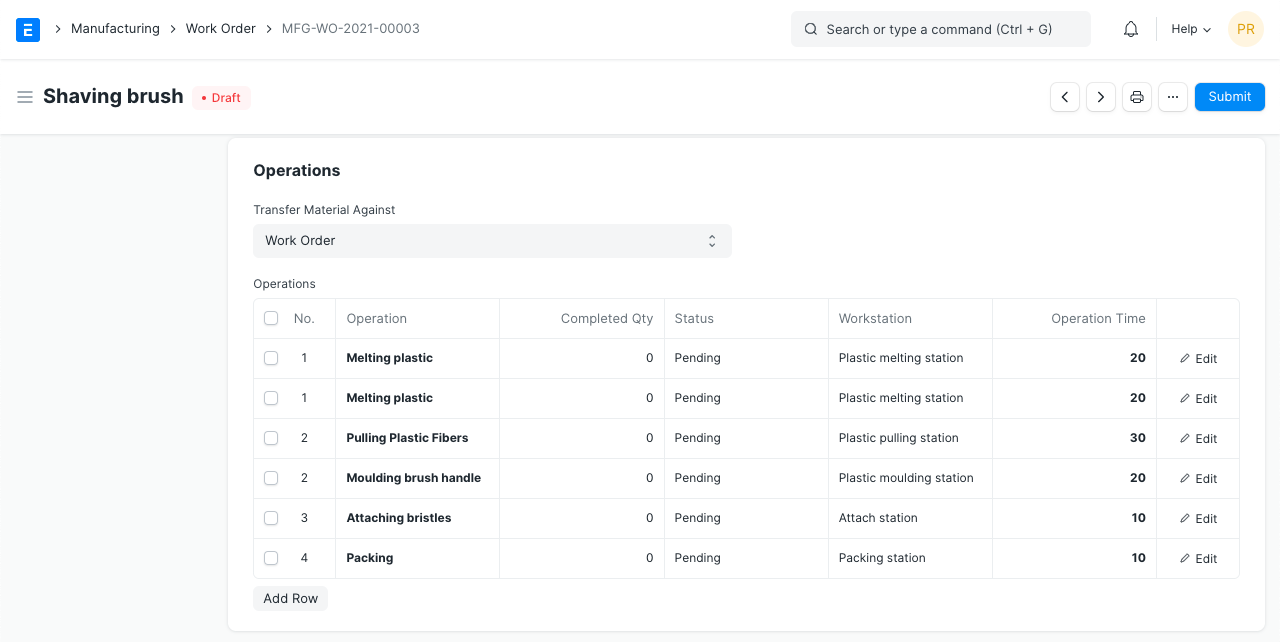
- In the Items table: The Operations which will be performed on the Items
These values can also be changed.
Once the Work Order is saved the following fields will be shown:
- Completed Qty: The number of Items on which this Operation was performed.
- Status: Whether the Operation is Pending, Work In Progress, or Completed. The status here is updated when the Job Cards are updated.
- Operation Time: This is fetched from the BOM, but can be changed.
- Planned Operating Cost: This is calculated based on the Operating Time, Hourly Rate, Quantity being manufactured, etc.
The Actual Operation Time, Actual Operating Cost, Actual Start Time, and Actual End Time are updated when Job Cards are updated.
3.3 Operation Cost
In this section, the following are shown:
- Planned Operating Cost: This is fetched as per the BOM and the Operations defined in it.
- Actual Operating Cost: This is fetched from the Job Cards based on the Operations run on the Items.
- Additional Operating Cost: Any additional expenses you may have incurred when manufacturing the Item can be added here.
- Total Operating Cost: This is calculated as Actual Operating Cost + Additional Operating Cost.
These values are calculated as per the Job Cards.

3.4 More Information
Here the Item Description and Stock UOM is shown for the Item being manufactured.
When a Work Order is created from a Material Request, it'll be shown here.
3.5 Transferring Materials for Manufacturing
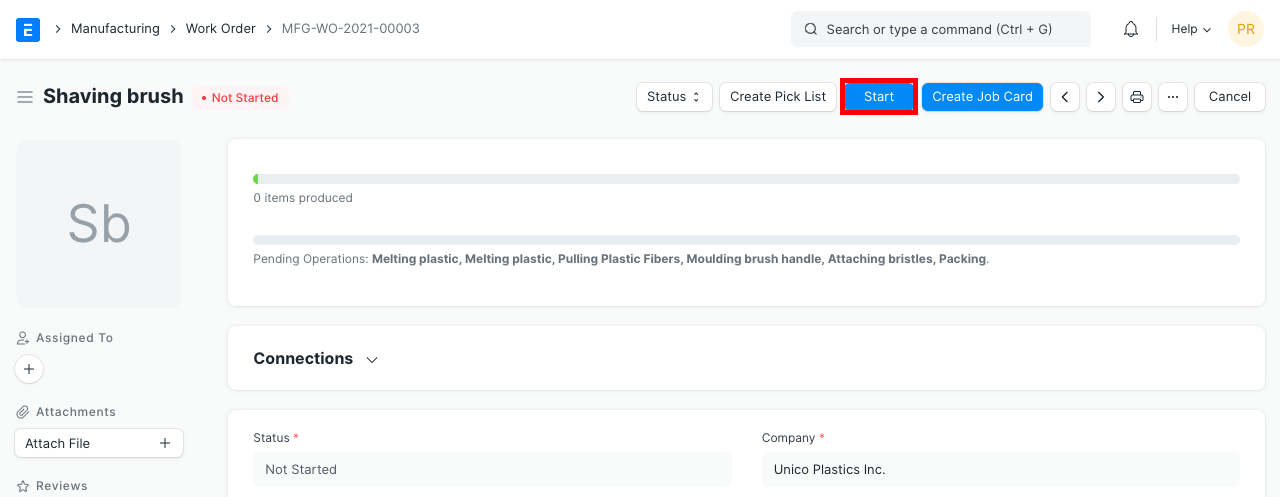
- Once you have submitted your Work Order, you need to Transfer the Raw Materials to initiate the Manufacturing Process.
- This will create a Stock Entry with all the Items required to complete this Work Order to be added to the WIP Warehouse. This will add the sub-assembly Items as is or explode them to show the raw materials depending on whether you ticked 'Use Multi-Level BOM' or not.
- Click on 'Start'. Once you click on Start, Job Cards will be created for the Operations involved.
 * Mention the quantity of materials to be transferred in this run.
 * You'll be taken to a Stock Entry for 'Material Transfer for Manufacture'. Submit it.
* Material Transferred for Manufacturing will be updated in the Work Order based on the Stock Entry.
* You'll be taken to a Stock Entry for 'Material Transfer for Manufacture'. Submit it.
* Material Transferred for Manufacturing will be updated in the Work Order based on the Stock Entry.
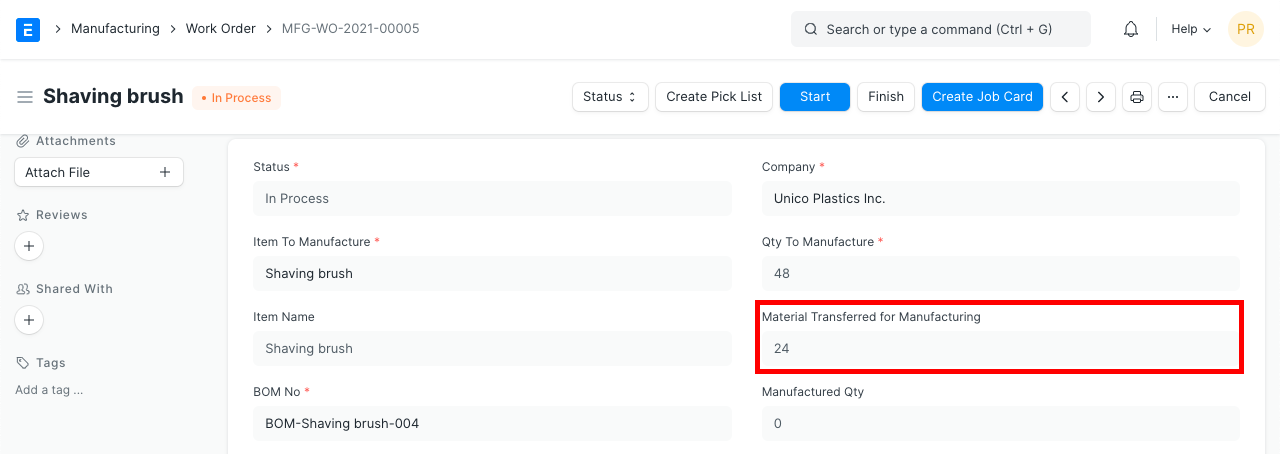 * Note: User can only transfer items which has "Include Item In Manufacturing" enabled in the item master
3.6 Material Transfer through Stock Entry
Use cases for this option are:
- If a material transfer is done in bulk and/or is not required to be tracked against a particular Work Order.
- If the responsibility for Material Transfer and Production Entry lies with two separate Users.
If this is the case, you can tick the 'Skip Material Transfer' checkbox, which will allow you to make the Stock Entry of type 'Manufacture' directly by clicking on the ‘Finish’ button.
3.7 Creating Job Cards
- Progress in the Work Order can be tracked using Job Cards
- Drafts of Job Cards are created based on when a Work Order is Submitted.
- To create more Job Cards against a Work Order click on the plus sign next to Job Card on the Work Order dashboard.
To know more about Job Cards, visit this page.
3.8 Updating Finished Goods
- Once you are done with the Work Order you need to update the Finished Goods.
- This will create a Stock Entry that will deduct all the items and sub-assemblies from the WIP Warehouse and add them to the Finished Goods Warehouse.
- Click on 'Finish'.
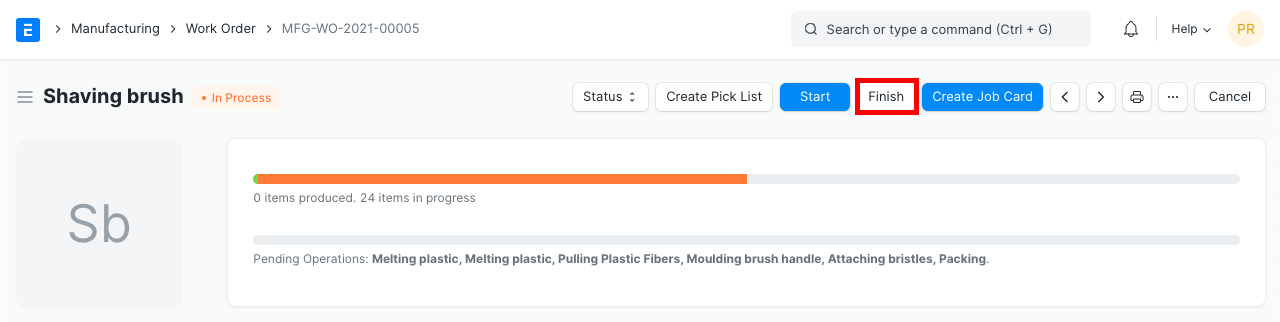 * Mention the quantity of materials to be transferred.
Tip: You can also partially complete a Work Order by updating the Finished Goods stock creating a Stock Entry.
3.9 Capacity Planning in Work Order
- When a Work Order is submitted, based on the Planned Start Date and the availability of the Workstations, the system schedules all operations for the Work Order (if Work Order has Operations specified).
- Drafts of Time Logs are also created based on the scheduled operations.
On Submitting the Work Order, the system will reserve a slot for each of the Work Order Operations serially after the planned start date based on the Workstation availability. The Workstation availability depends on the Workstation timings, holiday list, and if some other Work Order Operation is scheduled in that slot.
You can mention the number of days for the system to try scheduling the operations in the Manufacturing Settings. This is set to 30 Days by default. If the operation requires time exceeding the available slot, the system will ask you to break the operations. Once the scheduling is done the system will create Time Logs and save them. You can Modify them and submit them later.
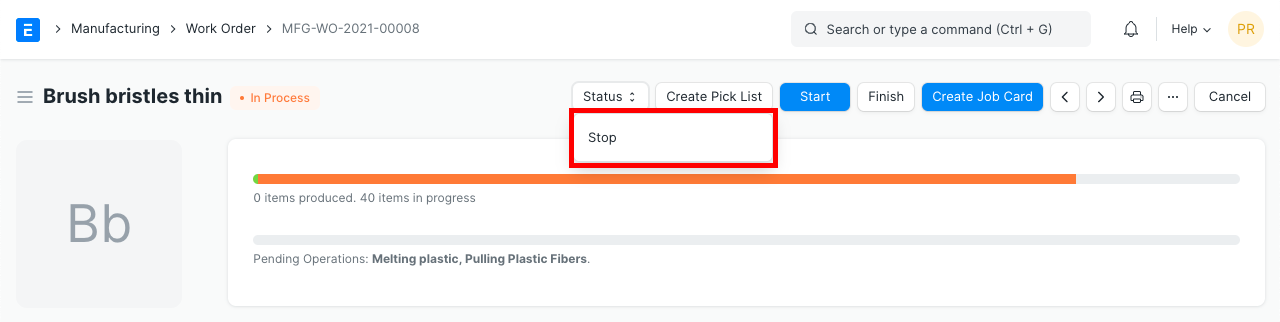
4.0 Stopping a Work Order
When you stop a Work Order its status is changed to Stopped indicating that all production process against that Work Order has stopped. But before stopping the work order user has to make sure that the raw materials which were transferred to the Work In Progress warehouse have been returned or not. In case, if the user has tried to stop the work order without returning the raw materials then the system will throw the error and not allow the user to stop the work order.
To stop a Work Order, click on the 'Stop' button.
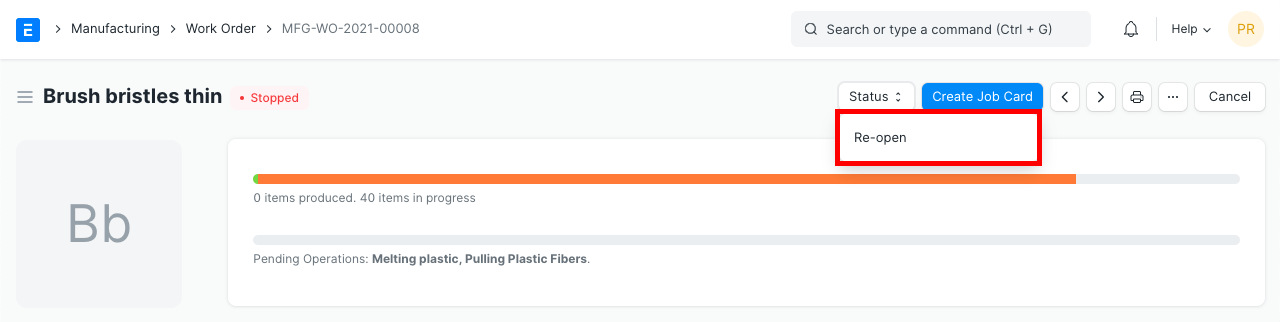
You can also re-open the stopped Work Order.
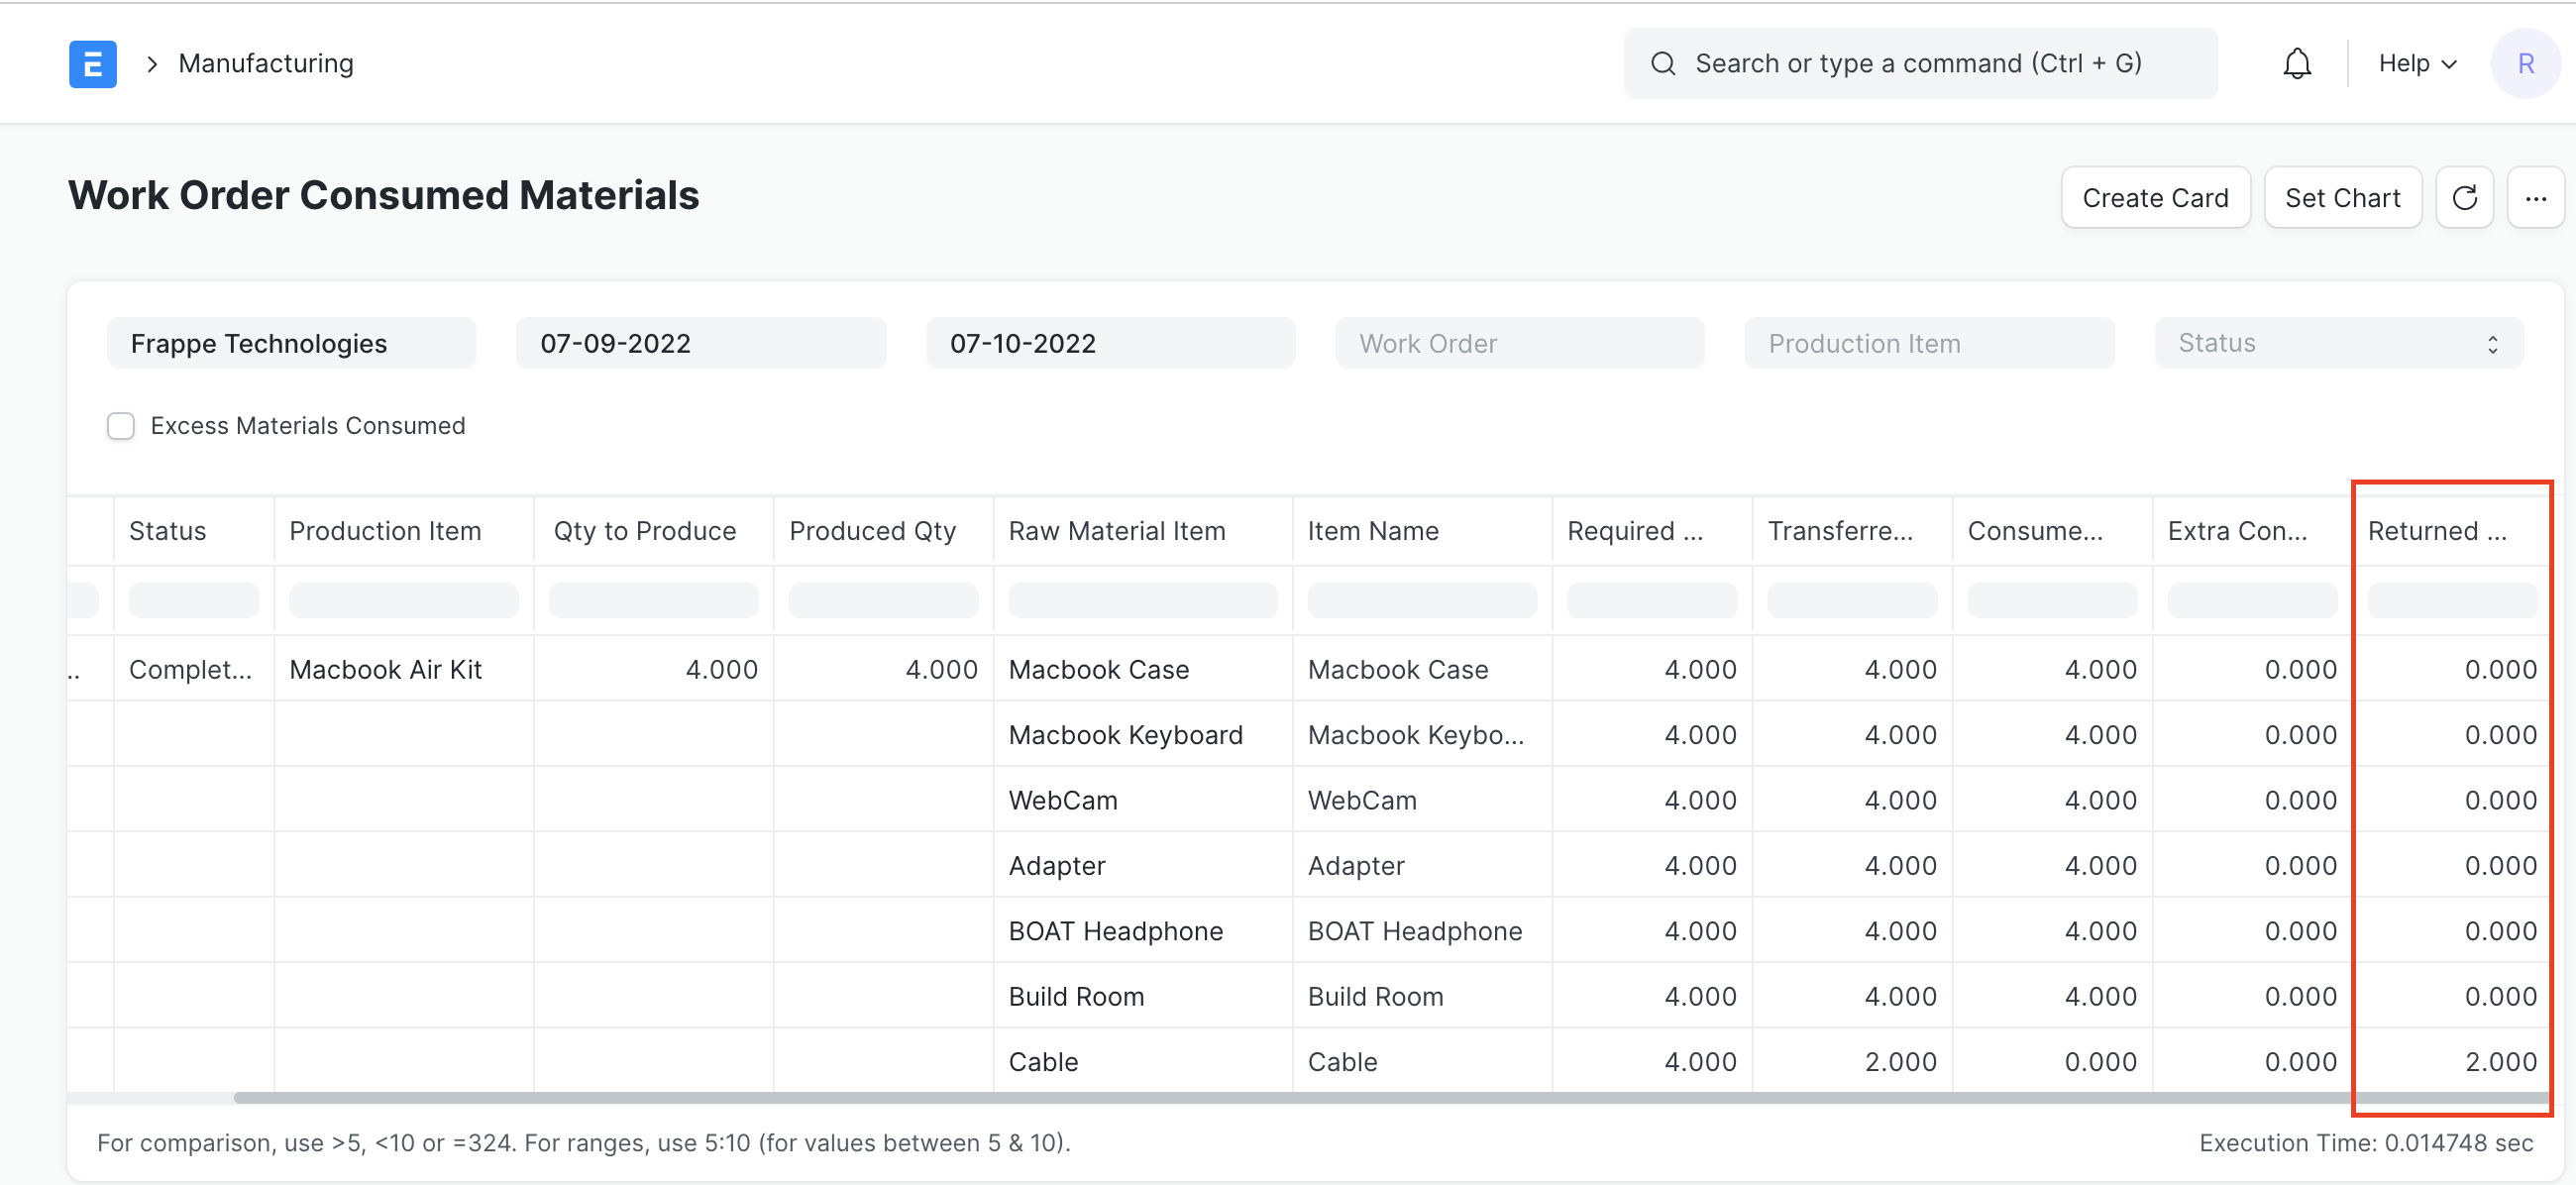
4.1 Return Non Consumed Materials to the Stores from WIP Warehouse
If you have transferred extra materials to the Work In Progress warehouse and after completion of the work order you want to return it to the Store warehouse. Then you have to goto the Work Order and click on Return Components. After that system creates the return stock entry with type as Material Transfer for Manufacture.
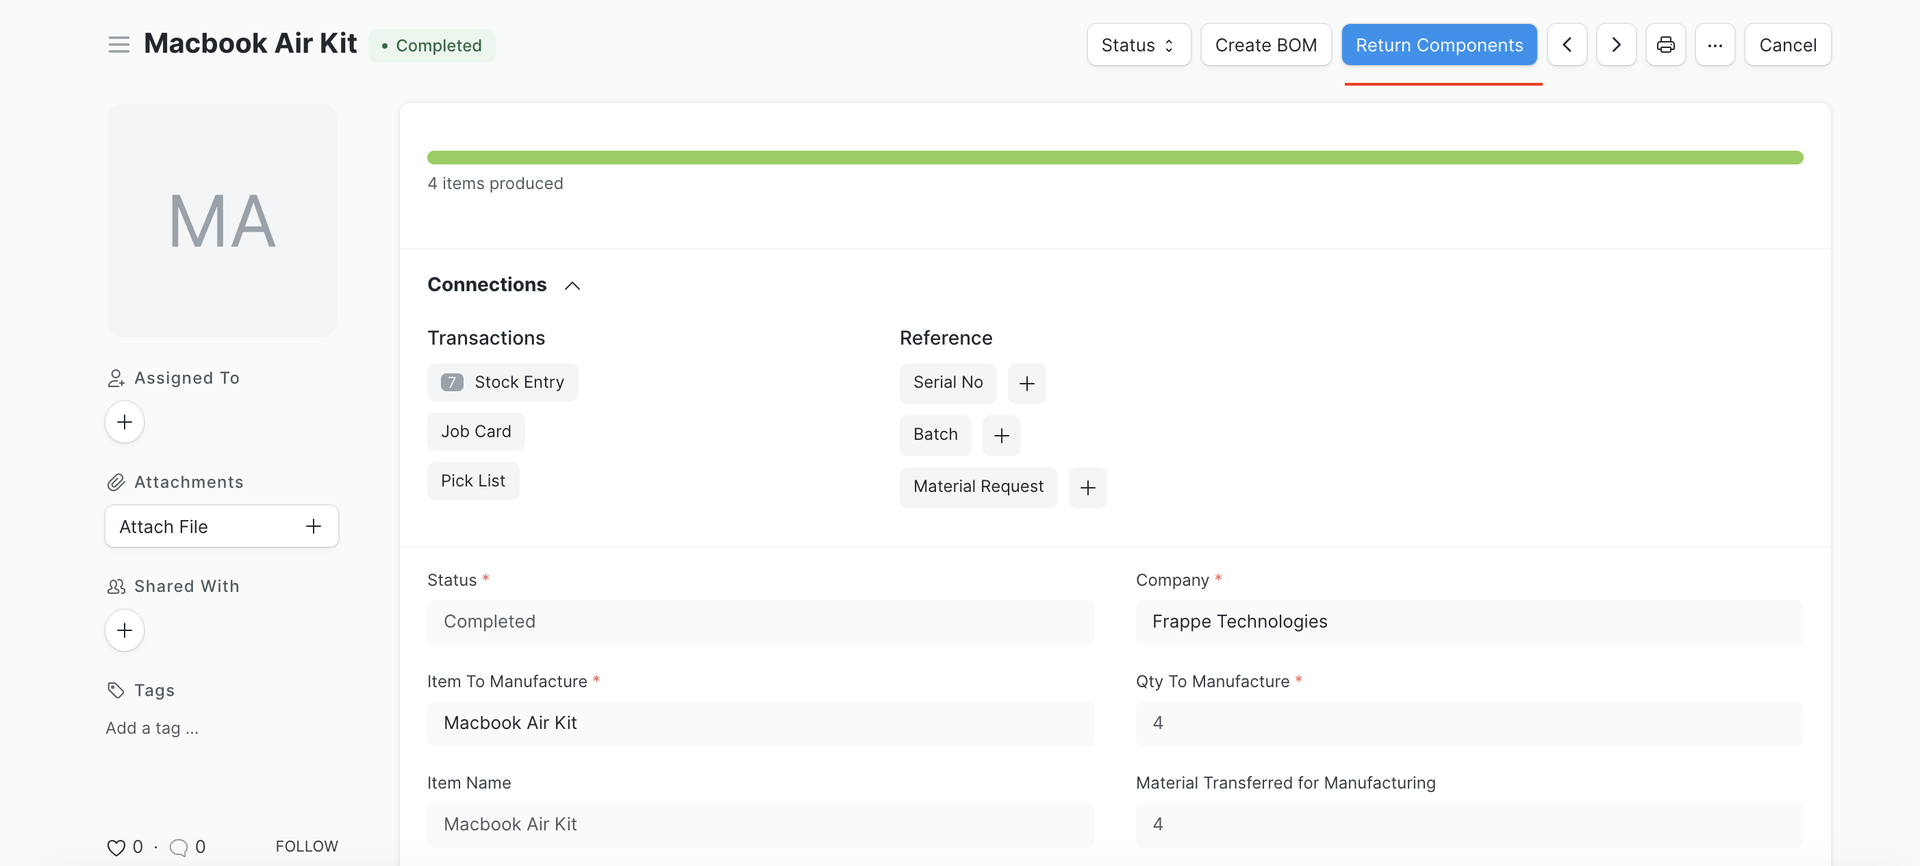
You can also checks the returned components against the work order using Work Order Consumed Materials report